Easy Sweet Soy Butter Korean Rice Cakes Recipe
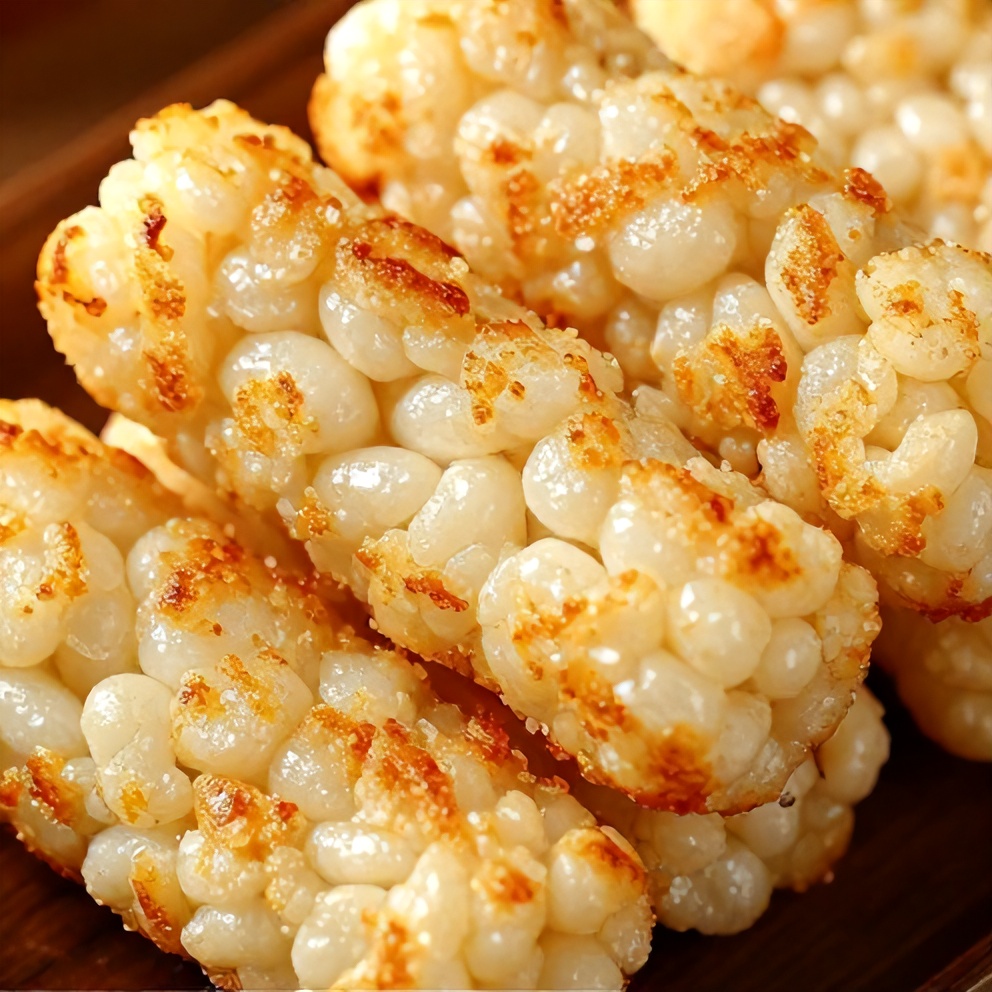
Easy Sweet Soy Butter Korean Rice Cakes – Crispy, sweet, and savory, these rice cakes are better than takeout and ready in just 20 minutes. After making these many times, I’ve discovered the trick to getting them perfectly crispy every time. Keep reading for my best tips. If you love recipes like this, you’ll also enjoy Creamy Cauliflower Sausage Kale Soup and Creamy Pancetta and Porcini Potato Gratin.
Why This Easy Sweet Soy Butter Korean Rice Cakes Recipe Is Pure Comfort
- Crispy on the outside, chewy on the inside
- Sweet and savory flavors in every bite
- Ready in just 20 minutes
- Better than takeout
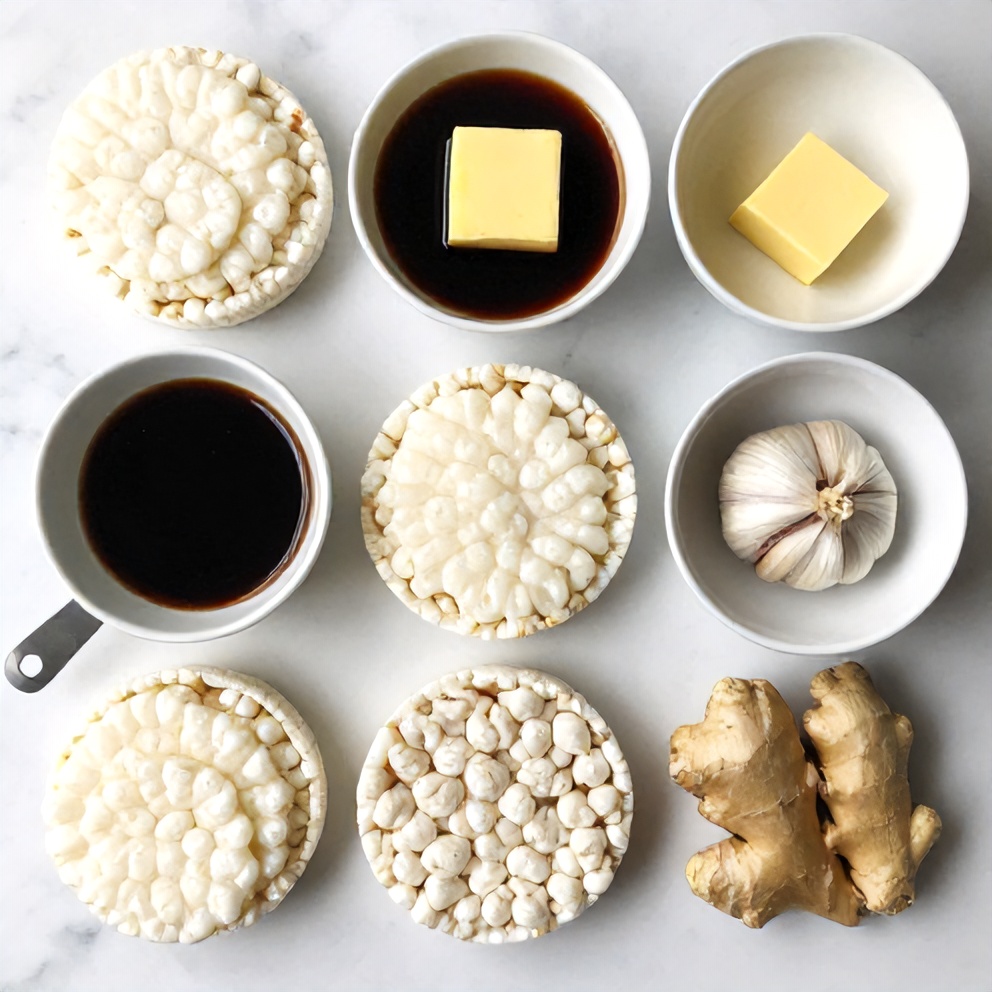
What You'll Need for Easy Sweet Soy Butter Korean Rice Cakes Recipe
Choosing the right ingredients makes a big difference, but this recipe is forgiving enough to work with what you have.
- Rice cakes
- Sweet soy sauce
- Butter
- Garlic
- Ginger
- Sweet soy sauce
- Garlic
- Ginger
- Sesame oil
- Sriracha (optional)
- Optional: Green onions
- Optional: Toasted sesame seeds
- Optional: Sriracha (optional)
📝 Ingredient Notes
- Rice cakes: Also known as tteok, these can be found in Asian grocery stores or online.
🛒 Tools & Equipment I Recommend
- Non-stick skillet — Ensures even cooking and prevents sticking. → See on Amazon
- Microplane grater — Makes quick work of grating ginger and garlic. → See on Amazon
How to Make Easy Sweet Soy Butter Korean Rice Cakes Recipe
- Step 1: In a small bowl, mix together sweet soy sauce, minced garlic, grated ginger, and sesame oil. Set aside.
- Step 2: Heat a large non-stick skillet over medium heat. Add butter and let it melt.
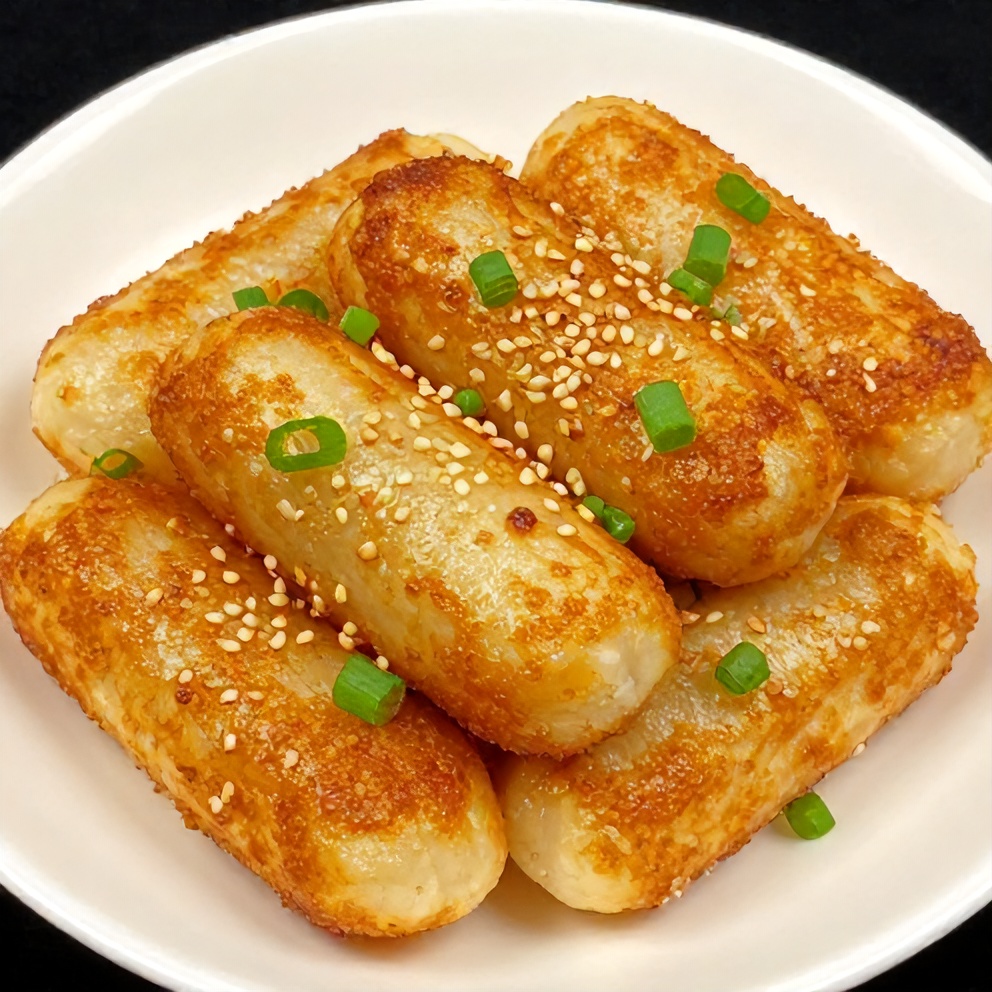
- Step 3: Add rice cakes to the skillet in a single layer. Cook until golden brown and crispy, about 2-3 minutes per side.
- Step 4: Pour the sauce over the rice cakes. Cook for an additional 1-2 minutes, until the sauce has thickened and coated the rice cakes.
- Step 5: Garnish with green onions and toasted sesame seeds. Serve immediately with sriracha on the side, if desired.
Cook's Tips for Perfect Easy Sweet Soy Butter Korean Rice Cakes Recipe
- Common mistake and fix: The #1 reason this recipe fails is using too much sauce. This can make the rice cakes soggy. To prevent this, use just enough sauce to coat the rice cakes, and cook until the sauce has thickened.
- Pro tip: For extra heat, add a drizzle of sriracha to the sauce before pouring it over the rice cakes.
- Pro tip: To make these ahead, cook the rice cakes but don't add the sauce. Reheat in the skillet with the sauce just before serving.
Storing & Reheating Easy Sweet Soy Butter Korean Rice Cakes Recipe
Short-Term Storage
Store in an airtight container in the fridge. Store leftovers in an airtight container in the fridge for up to 3 days. Make-ahead tip: The rice cakes can be cooked ahead of time, but the sauce is best made fresh.
Freezing Easy Sweet Soy Butter Korean Rice Cakes Recipe
Freezing is not recommended for this dish.
How to Reheat Without Drying It Out
Oven: Reheat in a 350°F oven for 5-7 minutes. Microwave: Reheat in the microwave for 1-2 minutes.
Recipe Notes
- Chef tip: For a gluten-free version, use tamari instead of sweet soy sauce.
- Best substitution: No substitutions are recommended for this recipe.
- Make-ahead: See storage notes for make-ahead tips.
- Scaling: This recipe can be easily doubled or tripled to serve a crowd.
- Troubleshooting: If your rice cakes are not crispy, try cooking them in a single layer and not overcrowding the pan.
Want to level up this recipe?
High-quality rice cakes — Ensure the best texture and flavor for your rice cakes. → Check price on Amazon
Easy Sweet Soy Butter Korean Rice Cakes Recipe
Ingredients
Main Ingredients
- Rice cakes
- Sweet soy sauce
- Butter
- Garlic
- Ginger
Seasonings
- Sweet soy sauce
- Garlic
- Ginger
- Sesame oil
- Sriracha (optional)
Optional Toppings
- Green onions
- Toasted sesame seeds
- Sriracha (optional)
Instructions
- Step 1: In a small bowl, mix together sweet soy sauce, minced garlic, grated ginger, and sesame oil. Set aside.
- Step 2: Heat a large non-stick skillet over medium heat. Add butter and let it melt.
- Step 3: Add rice cakes to the skillet in a single layer. Cook until golden brown and crispy, about 2-3 minutes per side.
- Step 4: Pour the sauce over the rice cakes. Cook for an additional 1-2 minutes, until the sauce has thickened and coated the rice cakes.
- Step 5: Garnish with green onions and toasted sesame seeds. Serve immediately with sriracha on the side, if desired.
Notes
- Chef tip: For a gluten-free version, use tamari instead of sweet soy sauce.
- Best substitution: No substitutions are recommended for this recipe.
- Make-ahead: See storage notes for make-ahead tips.
- Scaling: This recipe can be easily doubled or tripled to serve a crowd.
- Troubleshooting: If your rice cakes are not crispy, try cooking them in a single layer and not overcrowding the pan.
Storage
- Fridge: Store leftovers in an airtight container in the fridge for up to 3 days.
- Freezer: Freezing is not recommended for this dish.
- Oven reheat: Reheat in a 350°F oven for 5-7 minutes.
- Microwave reheat: Reheat in the microwave for 1-2 minutes.
- Make ahead: The rice cakes can be cooked ahead of time, but the sauce is best made fresh.
Nutrition Per Serving
- Calories: 250
- Protein: 5g
- Fat: 10g
- Carbs: 35g
- Fiber: 1g
- Sugar: 5g
- Sodium: 1200mg
- Cholesterol: 25mg
- Sat. Fat: 6g
Nutritional values are estimates only. Actual values may vary by brand and portion size.
Easy Sweet Soy Butter Korean Rice Cakes Recipe FAQs
See storage notes for make-ahead tips.
Using too much sauce can make the rice cakes soggy. Use just enough sauce to coat the rice cakes, and cook until the sauce has thickened.
Freezing is not recommended for this dish.
Add a drizzle of sriracha to the sauce before pouring it over the rice cakes.
These rice cakes are great as an appetizer or side dish. They pair well with Creamy Cauliflower Sausage Kale Soup or Creamy Pancetta and Porcini Potato Gratin.
A Warm Final Note
I can’t wait for you to try Easy Sweet Soy Butter Korean Rice Cakes Recipe and see how effortlessly it comes together. When you make it, pop back here and leave a rating or share how it turned out — I love hearing from you!