Crispy Fried Cheese Bites Ready in 20 Minutes

Crispy Fried Cheese Bites are the ultimate quick and easy appetizer. After making these many times, I’ve discovered the trick to perfectly crispy bites every time. The golden, melty cheese will make your whole kitchen smell amazing. Try them with my Crunchwrap Supreme Egg Rolls for a perfect game day spread. If you love recipes like this, you’ll also enjoy Crunchwrap Supreme Egg Rolls Recipe with Creamy Avocado Dip and Easy Stuffed Zucchini Boats with Ground Beef and Cheese.
Why This Crispy Fried Cheese Bites Ready in 20 Minutes Is Pure Comfort
- Ready in just 20 minutes
- Golden, crispy exterior
- Melty, gooey cheese inside
- Better than takeout
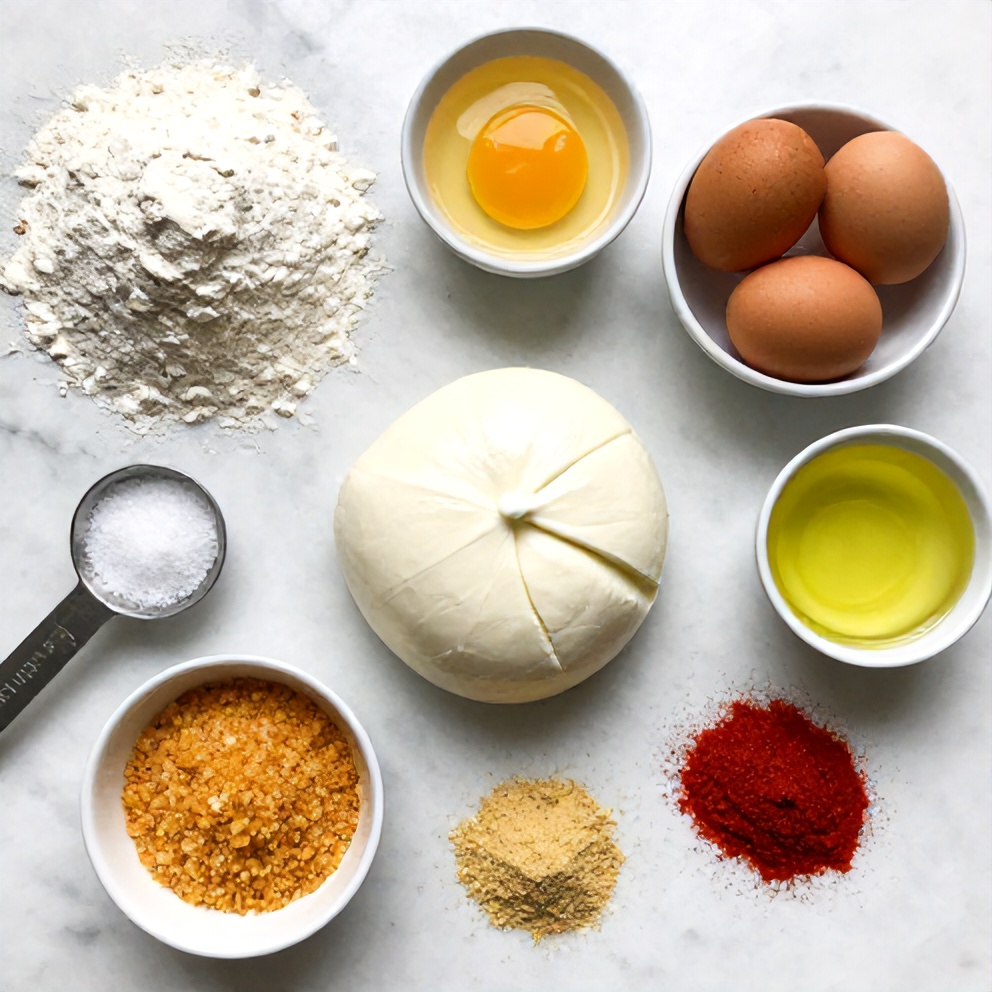
What You'll Need for Crispy Fried Cheese Bites Ready in 20 Minutes
Choosing the right ingredients makes a big difference, but this recipe is forgiving enough to work with what you have.
- Mozzarella cheese
- All-purpose flour
- Eggs
- Panko breadcrumbs
- Vegetable oil
- Salt
- Garlic powder
- Paprika
- Optional: Marinara sauce
- Optional: Parmesan cheese
- Optional: Fresh basil
📝 Ingredient Notes
- Mozzarella cheese: Use low-moisture mozzarella for best results.
🛒 Tools & Equipment I Recommend
- Cast iron skillet — Even heat for perfect crispiness → See on Amazon
- Deep fryer — Safety and convenience for frying → See on Amazon
How to Make Crispy Fried Cheese Bites Ready in 20 Minutes
- Prepare the cheese: Cut mozzarella into bite-sized pieces and freeze for 15 minutes.
- Set up the coating station: In three separate bowls, place flour, beaten eggs, and panko breadcrumbs mixed with salt, garlic powder, and paprika.
- Coat the cheese: Dip each cheese piece into flour, then eggs, then breadcrumbs, pressing gently to adhere.
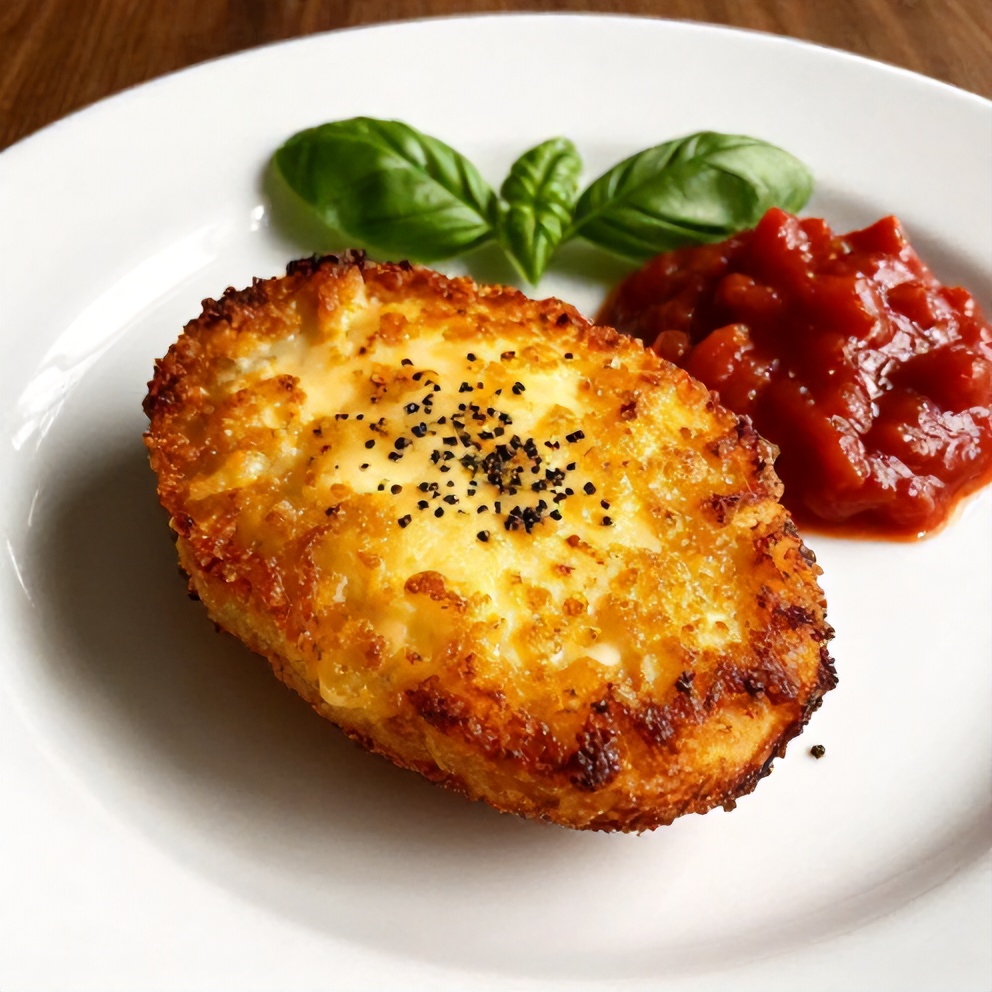
- Fry the cheese: Heat oil to 350°F (175°C) and fry cheese bites in batches for 2-3 minutes or until golden brown. Drain on paper towels.
Cook's Tips for Perfect Crispy Fried Cheese Bites Ready in 20 Minutes
- Common mistake and fix: Freezing the cheese before frying prevents it from melting too quickly and helps achieve a crispy exterior.
- Tip: For a lighter version, try baking the cheese bites at 400°F (200°C) for 15-20 minutes, flipping halfway.
- Tip: Serve immediately for the best texture and taste.
Storing & Reheating Crispy Fried Cheese Bites Ready in 20 Minutes
Short-Term Storage
Store in an airtight container in the fridge. Store leftover cheese bites in an airtight container in the fridge for up to 3 days. Make-ahead tip: Prepare the cheese bites up to the frying stage and refrigerate for up to 24 hours. Fry as directed.
Freezing Crispy Fried Cheese Bites Ready in 20 Minutes
Freeze uncooked cheese bites for up to 2 months. Fry from frozen, adding 1-2 minutes to cooking time.
How to Reheat Without Drying It Out
Oven: Reheat in the oven at 350°F (175°C) for 5-7 minutes or until crispy. Microwave: Reheat in the microwave for 15-20 seconds, then crisp up in the oven for 2-3 minutes.
Recipe Notes
- Chef tip: For a spicy kick, add some red pepper flakes to the breadcrumb mixture.
- Best substitution: Cheddar cheese can be used as a substitute for mozzarella.
- Make-ahead: See storage notes for make-ahead tips.
- Scaling: This recipe can easily be doubled or tripled for larger crowds.
- Troubleshooting: If your cheese bites are not crispy, try increasing the frying temperature or frying for a longer time.
Want to level up this recipe?
Digital thermometer — Ensures perfect frying temperature → Check price on Amazon
Crispy Fried Cheese Bites Ready in 20 Minutes
Ingredients
Main Ingredients
- Mozzarella cheese
- All-purpose flour
- Eggs
- Panko breadcrumbs
- Vegetable oil
Seasonings
- Salt
- Garlic powder
- Paprika
Optional Toppings
- Marinara sauce
- Parmesan cheese
- Fresh basil
Instructions
- Prepare the cheese: Cut mozzarella into bite-sized pieces and freeze for 15 minutes.
- Set up the coating station: In three separate bowls, place flour, beaten eggs, and panko breadcrumbs mixed with salt, garlic powder, and paprika.
- Coat the cheese: Dip each cheese piece into flour, then eggs, then breadcrumbs, pressing gently to adhere.
- Fry the cheese: Heat oil to 350°F (175°C) and fry cheese bites in batches for 2-3 minutes or until golden brown. Drain on paper towels.
Notes
- Chef tip: For a spicy kick, add some red pepper flakes to the breadcrumb mixture.
- Best substitution: Cheddar cheese can be used as a substitute for mozzarella.
- Make-ahead: See storage notes for make-ahead tips.
- Scaling: This recipe can easily be doubled or tripled for larger crowds.
- Troubleshooting: If your cheese bites are not crispy, try increasing the frying temperature or frying for a longer time.
Storage
- Fridge: Store leftover cheese bites in an airtight container in the fridge for up to 3 days.
- Freezer: Freeze uncooked cheese bites for up to 2 months. Fry from frozen, adding 1-2 minutes to cooking time.
- Oven reheat: Reheat in the oven at 350°F (175°C) for 5-7 minutes or until crispy.
- Microwave reheat: Reheat in the microwave for 15-20 seconds, then crisp up in the oven for 2-3 minutes.
- Make ahead: Prepare the cheese bites up to the frying stage and refrigerate for up to 24 hours. Fry as directed.
Nutrition Per Serving
- Calories: 270
- Protein: 12g
- Fat: 18g
- Carbs: 15g
- Fiber: 0g
- Sugar: 1g
- Sodium: 500mg
- Cholesterol: 65mg
- Sat. Fat: 10g
Nutritional values are estimates only. Actual values may vary by brand and portion size.
Crispy Fried Cheese Bites Ready in 20 Minutes FAQs
Yes, you can prepare the cheese bites up to the frying stage and refrigerate for up to 24 hours. Fry as directed.
Ensure your oil temperature is high enough (350°F/175°C) and fry the cheese bites for long enough (2-3 minutes).
Yes, you can bake them at 400°F (200°C) for 15-20 minutes, flipping halfway. They won't be as crispy as fried, but still delicious.
Low-moisture mozzarella works best, but cheddar can also be used.
Yes, freeze uncooked cheese bites for up to 2 months. Fry from frozen, adding 1-2 minutes to cooking time.
A Warm Final Note
I can’t wait for you to try Crispy Fried Cheese Bites Ready in 20 Minutes and see how effortlessly it comes together. When you make it, pop back here and leave a rating or share how it turned out — I love hearing from you!