Easy Fruity Pebbles Cheesecake Tacos – Better Than Takeout
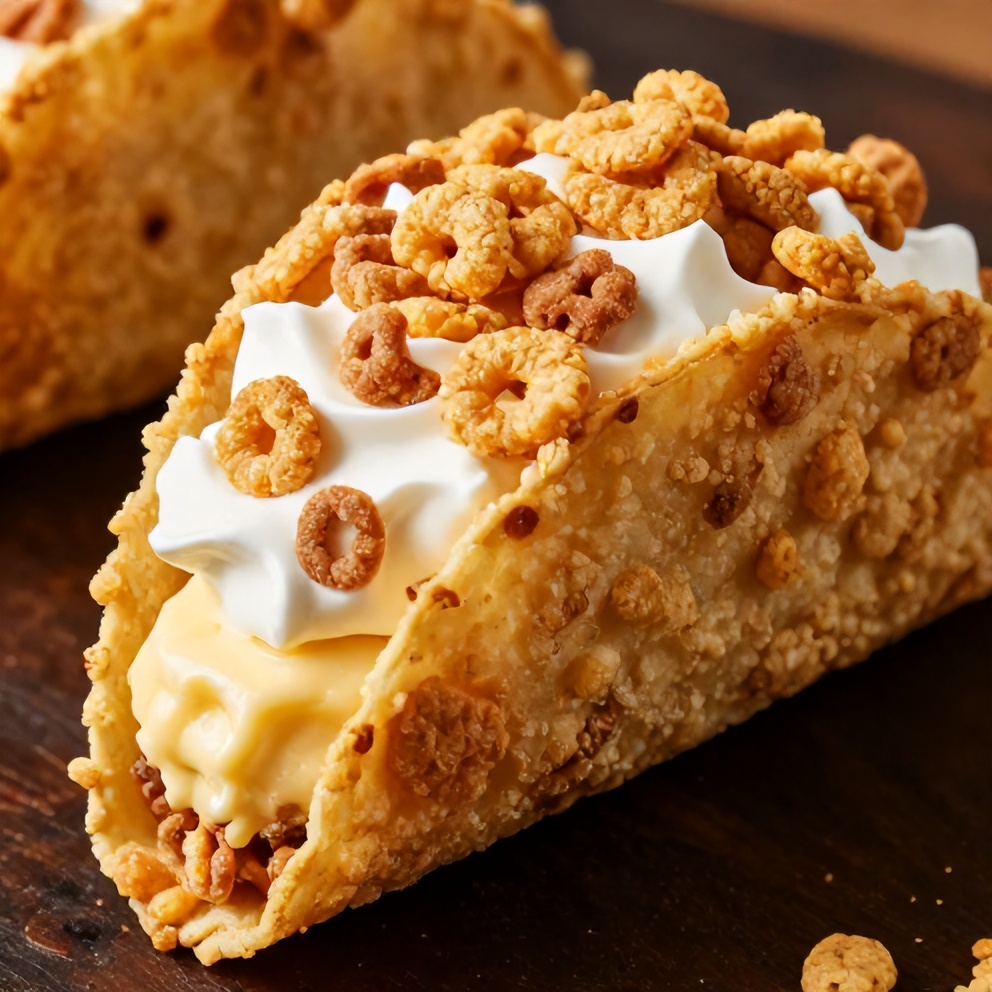
Easy Fruity Pebbles Cheesecake Tacos are the ultimate fun and easy dessert that’s better than takeout! After making these many times, I’ve discovered the trick to getting the perfect crispy shell every time. Keep reading for my best tips on how to make these irresistible treats. If you love recipes like this, you’ll also enjoy Easy High Protein Turkey Meatballs Meal Prep Recipe and Easy No-Bake Mango Coconut Rice Pudding Recipe.
Why This Easy Fruity Pebbles Cheesecake Tacos – Better Than Takeout Is Pure Comfort
- Crispy, fruity cereal coating
- Creamy, tangy cheesecake filling
- Ready in just 20 minutes
- Perfect for parties or a fun dessert at home
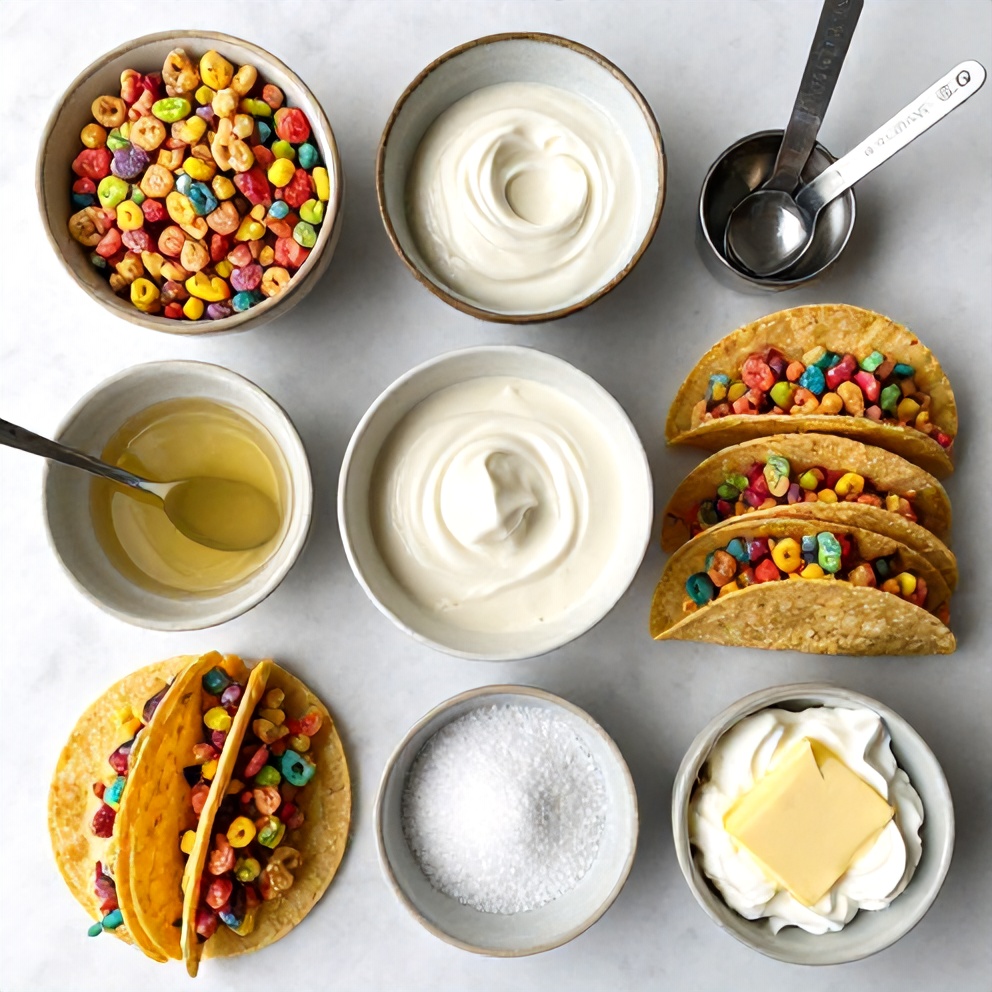
What You'll Need for Easy Fruity Pebbles Cheesecake Tacos – Better Than Takeout
Choosing the right ingredients makes a big difference, but this recipe is forgiving enough to work with what you have.
- Fruity Pebbles cereal
- Cream cheese
- Sweetened condensed milk
- Vanilla extract
- Taco shells
- Sugar
- Salt
- Whipped cream (optional, for topping)
- Optional: Fresh berries
- Optional: Chocolate syrup
- Optional: Crushed nuts
📝 Ingredient Notes
- Fruity Pebbles cereal: Use the fruity variety for the best flavor.
🛒 Tools & Equipment I Recommend
- Food processor — Makes quick work of crushing cereal for the coating. → See on Amazon
- Parchment paper — Prevents shells from sticking and makes cleanup a breeze. → See on Amazon

How to Make Easy Fruity Pebbles Cheesecake Tacos – Better Than Takeout
- Prepare the cheesecake filling: Beat cream cheese, sweetened condensed milk, and vanilla extract until smooth. Chill in the fridge while preparing the shells.
- Crush the cereal: Pulse Fruity Pebbles cereal in a food processor until you have fine crumbs. Mix with sugar and salt.
- Coat the taco shells: Melt butter in a large skillet over medium heat. Dip each taco shell into the butter, then press into the cereal mixture, coating evenly. Place on a parchment-lined baking sheet.
- Bake the shells: Bake at 375°F (190°C) for 5-7 minutes or until golden and crispy. Let cool slightly.
- Assemble the tacos: Fill each shell with a generous scoop of cheesecake filling. Top with whipped cream and desired toppings. Serve immediately.
Cook's Tips for Perfect Easy Fruity Pebbles Cheesecake Tacos – Better Than Takeout
- : For extra crispy shells, bake the coated shells for an additional 2-3 minutes after filling.
- Common mistake and fix: If your cheesecake filling is too thick, add a tablespoon or two of milk to thin it out.
- : To make ahead, prepare the cheesecake filling and crush the cereal up to 2 days in advance. Store separately in the fridge.
Storing & Reheating Easy Fruity Pebbles Cheesecake Tacos – Better Than Takeout
Short-Term Storage
Store in an airtight container in the fridge. Store leftover filled tacos in an airtight container in the fridge for up to 3 days. Make-ahead tip: Prepare the cheesecake filling and crush the cereal up to 2 days in advance.
Freezing Easy Fruity Pebbles Cheesecake Tacos – Better Than Takeout
Not recommended for freezing.
How to Reheat Without Drying It Out
Oven: Reheat in the oven at 350°F (175°C) for 5-7 minutes or until warmed through. Microwave: Not recommended for reheating.
Recipe Notes
- Chef tip: For a fun presentation, serve these tacos on a platter with the filling spilling out the sides.
- Best substitution: Substitute Fruity Pebbles with another fruity cereal for a similar taste.
- Make-ahead: See storage notes for make-ahead tips.
- Scaling: This recipe can easily be doubled or tripled for larger crowds.
- Troubleshooting: If your shells are breaking, try using a fork to gently press the cereal mixture onto the shells before baking.
Want to level up this recipe?
High-quality taco shells — Ensure even browning and prevent breaking for the perfect taco shell. → Check price on Amazon
Easy Fruity Pebbles Cheesecake Tacos – Better Than Takeout
Ingredients
Main Ingredients
- Fruity Pebbles cereal
- Cream cheese
- Sweetened condensed milk
- Vanilla extract
- Taco shells
Seasonings
- Sugar
- Salt
- Whipped cream (optional, for topping)
Optional Toppings
- Fresh berries
- Chocolate syrup
- Crushed nuts
Instructions
- Prepare the cheesecake filling: Beat cream cheese, sweetened condensed milk, and vanilla extract until smooth. Chill in the fridge while preparing the shells.
- Crush the cereal: Pulse Fruity Pebbles cereal in a food processor until you have fine crumbs. Mix with sugar and salt.
- Coat the taco shells: Melt butter in a large skillet over medium heat. Dip each taco shell into the butter, then press into the cereal mixture, coating evenly. Place on a parchment-lined baking sheet.
- Bake the shells: Bake at 375°F (190°C) for 5-7 minutes or until golden and crispy. Let cool slightly.
- Assemble the tacos: Fill each shell with a generous scoop of cheesecake filling. Top with whipped cream and desired toppings. Serve immediately.
Notes
- Chef tip: For a fun presentation, serve these tacos on a platter with the filling spilling out the sides.
- Best substitution: Substitute Fruity Pebbles with another fruity cereal for a similar taste.
- Make-ahead: See storage notes for make-ahead tips.
- Scaling: This recipe can easily be doubled or tripled for larger crowds.
- Troubleshooting: If your shells are breaking, try using a fork to gently press the cereal mixture onto the shells before baking.
Storage
- Fridge: Store leftover filled tacos in an airtight container in the fridge for up to 3 days.
- Freezer: Not recommended for freezing.
- Oven reheat: Reheat in the oven at 350°F (175°C) for 5-7 minutes or until warmed through.
- Microwave reheat: Not recommended for reheating.
- Make ahead: Prepare the cheesecake filling and crush the cereal up to 2 days in advance.
Nutrition Per Serving
- Calories: 250
- Protein: 5g
- Fat: 10g
- Carbs: 35g
- Fiber: 0g
- Sugar: 22g
- Sodium: 250mg
- Cholesterol: 35mg
- Sat. Fat: 6g
Nutritional values are estimates only. Actual values may vary by brand and portion size.
Easy Fruity Pebbles Cheesecake Tacos – Better Than Takeout FAQs
Yes, you can prepare the cheesecake filling and crush the cereal up to 2 days in advance. Store separately in the fridge. Assemble just before serving.
If your cheesecake filling is too thick, add a tablespoon or two of milk to thin it out.
Yes, you can substitute Fruity Pebbles with another fruity cereal for a similar taste.
Gently press the cereal mixture onto the shells using a fork before baking to help prevent breaking.
Store leftover filled tacos in an airtight container in the fridge for up to 3 days.
A Warm Final Note
I can’t wait for you to try Easy Fruity Pebbles Cheesecake Tacos – Better Than Takeout and see how effortlessly it comes together. When you make it, pop back here and leave a rating or share how it turned out — I love hearing from you!